This guide will cover the basic steps to configure your MPC for MIDI input/output control to an external device using a 5-Pin MIDI DIN connection.
TABLE OF CONTENTS
- MIDI In from an External Device
- MIDI Out to an External Device
- Audio Set Up
- MIDI Sync
- MIDI Machine Control (MMC)
MIDI In from an External Device
- Connect a standard 5-Pin MIDI DIN cable to your MPC's MIDI In port.
- Connect the other end of the 5-Pin MIDI DIN cable to your external device's MIDI Out port
- Go to Menu > Preferences > MIDI / Sync.
Input Ports: You will then need to enable the physical 5-Pin MIDI Input port for your MPC
| Physical 5-Pin MIDI Input Port as they appear in Input Ports | Enable these ports |
| MPC 1, MPC 2 (MPC X, X SE, MPC Live, Live II) | Global, Track, Sync |
| MIDI Port (MPC Key 37, MPC Key 61) | Global, Track, Sync |
| MPC (MPC One, MPC One +) | Global, Track, Sync |
MPC Keyboard | Global, Track, Sync |
MPC Pads | Global, Track, Sync |

4. Create a new MIDI Track on the MPC

5. Set the appropriate MIDI Input port
| MPC Model | Physical 5-Pin MIDI Input Port as they appear in Main Mode |
| MPC X, X SE, MPC Live, Live II | MPC 1, MPC2 |
| MPC Key 37, MPC Key 61 | MIDI Port |
| MPC One, MPC One + | MPC |

6. Configure your external device properly so it can send MIDI to the MPC.
MIDI Out to an External Device
- Connect a standard 5-Pin MIDI DIN cable to your MPC's MIDI Out port.
- Connect the other end of the 5-Pin MIDI DIN cable to your external device's MIDI In port
- Go to Menu > Preferences > MIDI / Sync:
Input Ports: Enable the MPC Pads & Keyboard ports
| Input Ports | Enable these ports |
MPC Keyboard | Global, Track, Sync |
MPC Pads | Global, Track, Sync |
Output Ports: You will then need to enable the physical 5-Pin MIDI Output port for your MPC
| Physical 5-Pin MIDI Output Port as they appear in Output Ports | Enable these ports |
| MPC A, MPC B, MPC C, MPC D (MPC X, X SE) | Track, Sync |
| MPC A, MPC B (MPC Live, Live II) | Track, Sync |
| MIDI Port (MPC Key 37, MPC Key 61) | Track, Sync |
| MPC (MPC One, MPC One +) | Track, Sync |

4. Create a new MIDI Track on the MPC
5. Set the appropriate MIDI Output Port
| MPC Model | Physical 5-Pin MIDI Output Port as they appear in Main Mode |
| MPC X, MPC X SE | MPC A, MPC B, MPC C, MPC D |
| MPC Live, MPC Live II | MPC A, MPC B |
| MPC Key 37, MPC Key 61 | MIDI Port |
| MPC One, MPC One + | MPC |

Configure your external device properly so it can receive MIDI from the MPC.
Audio Set Up
In the scenario that you are using the MPC to trigger sounds from your external synth, please see the steps to route the audio correctly:
1. Connect 1/4inch TRS jack cables from the MPC's Inputs to your synths Main Outputs
2. Connect 1/4inch TRS audio cables from the MPC's Main Outputs to the Inputs of your external speakers or audio interface
3. Go to MPC Sampler and chose Input 1,2 then select the In monitoring state:


MIDI Sync
When using the MPC to sync an external device, you'll need to ensure your Sync Receive/Send settings are configured correctly.
The Sync Receive/Send section in the MIDI/Sync tab allows you to configure which type of clock will be sent or received by the MPC. You can select MIDI Clock, MIDI Time Code (MTC), or Ableton Link.


Transport controls (Play, Stop, Record, etc.) can be synced by enabling the corresponding box:

Receive MMC: The MPC will react to incoming transport messages sent from external gear. Be sure to verify that your external hardware is capable of sending MMC messages.
Send MMC: The MPC will send transport messages to connected external gear. Be sure to verify that your external hardware is capable of receiving MMC messages.
MMC (MIDI Machine Control) is a standard protocol that will automatically communicate with other MMC-enabled devices.
MTC Frame Rate: This determines the frame rate used by MIDI Time Code (MTC), which is important for correct timing, especially when working on film scoring projects. In most cases, you should select 25.
Start Time: This is the starting time that will be sent when Send MIDI is set to anything other than Off. The time is formatted in hours:minutes:seconds:frames.
Filter ‘All Notes Off’ CC: When enabled, “All Notes Off” (“MIDI panic”) messages will be ignored. This is useful if you are using an external MIDI device that can send these types of messages, but you want to filter them out. When disabled, “All Notes Off” messages will be received normally.
MIDI Machine Control (MMC)
Your MPC hardware can also send and receive MIDI Machine Control (MMC) messages, a standard protocol for transport controls.
The MPC hardware can send these messages:
| MPC Button | MMC Command Sent |
| Rec | MMC Record Strobe (when recording starts), then MMC Record Exit |
| Overdub | MMC Record Strobe (when recording starts), then MMC Record Exit |
| Stop | MMC Stop |
| Play | MMC Deferred Play |
| Play Start | MMC Locate Zero, then Deferred Play |
| Data Dial, –/+, Step , Bar <> | MMC Locate values |
To set up your MPC hardware to send MMC messages to an external device:
Important: Your external device must also be capable of receiving MMC for this set up to work.
1. Use a standard 5-pin MIDI cable to connect your MPC hardware’s MIDI Out A to the MIDI input of your external device.
2. Press Menu to show the menu, and tap the gear icon to enter the Preferences.
3. Tap the Sync tab.
4. Tap the Send Port 1 field, and use the data dial or –/+ buttons to select Midi Out A.
5. Tap the Send MMC box so it is enabled (checked).
6. Exit the Preferences.
7. Configure your other device properly so it can receive MMC messages.
The MPC hardware can receive these messages:
| MPC Command Received | MPC Function |
| MMC Deferred Play | Play |
| MMC Locate Zero, then Deferred Play | Play Start |
| MMC Stop | Stop |
| MMC Record Strobe | Record (Rec) |
| MMC Pause | Stop |
| MMC Locate values | Change location in sequence |
To set up your MPC hardware to receive MMC messages from an external device:
Important: Your external device must also be capable of sending MMC and generating MIDI Clock for this set up to work.
1. Use a standard 5-pin MIDI cable to connect your MPC hardware’s MIDI In A to the MIDI output of your external device.
2. Press Menu to show the menu, and tap the gear icon to enter the Preferences.
3. Tap the Sync tab.
4. Tap the Receive MMC box so it is enabled (checked).
5. Exit the Preferences.
6. Configure your other device properly so it can send MMC messages.
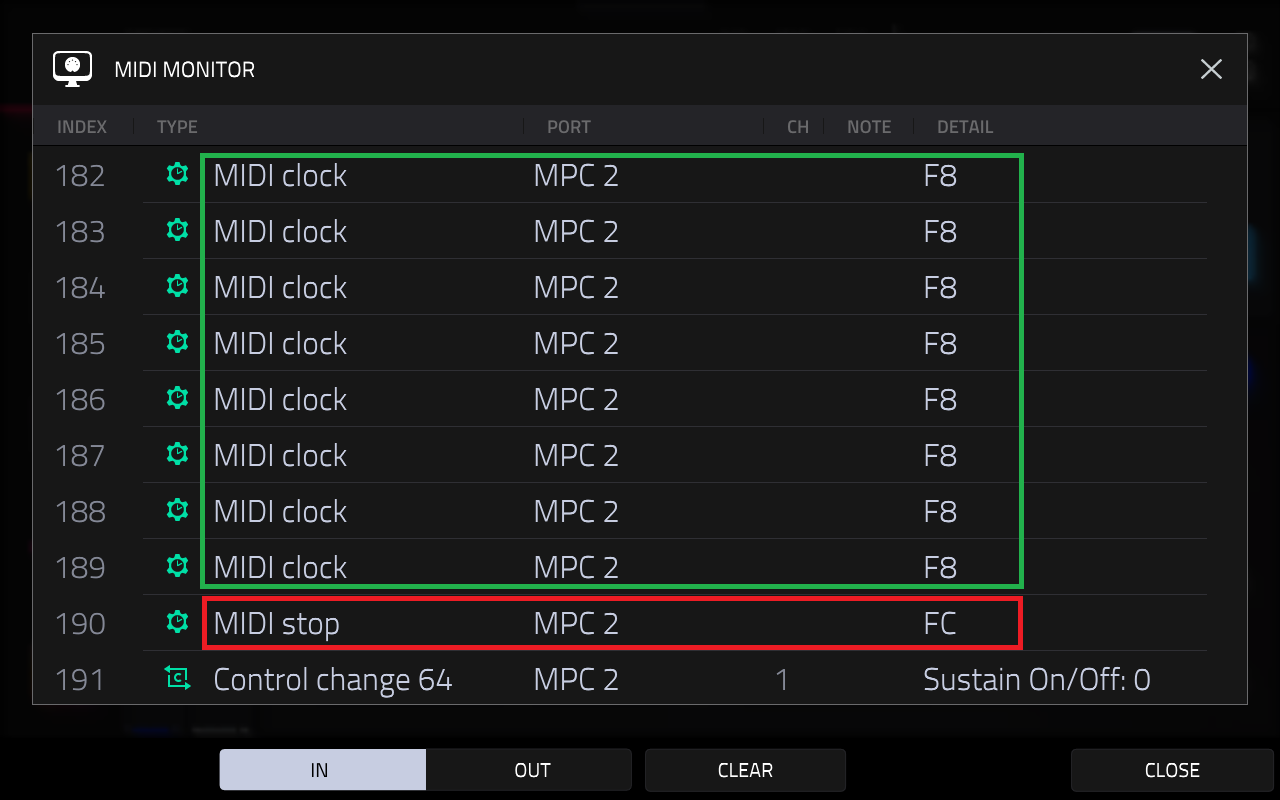
Please see an example of the MPC receiving Play (F8) and Stop (FC) using MMC / MIDI Clock: