
Whether you own an MPC or not, MPK 2 users now have the ability to interact directly with the MPC software for comprehensive interfacing and manipulation of virtual instruments, effect plugins, DAWs, and more. This article walks through how to set up an MPK2 series controller with the MPC 2.0 Software.
CONTENTS
Installing the MPC 2.0 Software
Before you begin setting up your MPK2 series controller, you must first install the MPC 2.0 Software. This knowledge base article walks through the process of installing and activating the software: Akai Pro MPC Software 2.0 - How to Download, Install, and Activate Keep in mind, if you have purchased the software using the promotional code in your Akai Pro account, your download link and authorization code will be sent to you in an email confirmation after the purchase. When you have installed and authorized the software, you are ready to configure it for use with your MPK2 controller. This guide will show you how to:
- Activate MIDI inputs in MPC to trigger pads and software instruments from the MPK2 controller.
- Map transport controls (play, stop, record).
- Send MIDI clock to sync the arpeggiator and Note Repeat.
MPK2 Series Hardware Setup
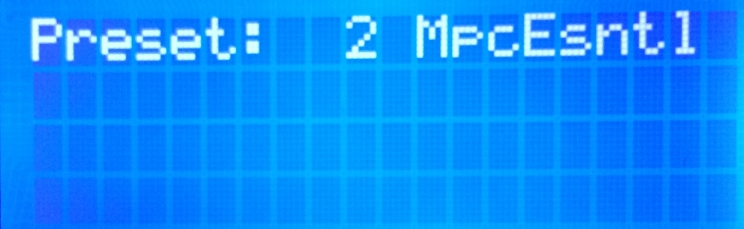
2. Press the PRESET button and use the Data Dial to scroll to Preset: 2 MpcEsntl. Press in the Data Dial to confirm your selection.
3. Press the EDIT button and then press one of the transport controls such as STOP, PLAY, or REC. Use the Data Dial to change the Type field to MMC. Push in the Data Dial to confirm your selection.

4. Press the PRESET button to return to the main preset screen.
5. Press the GLOBAL button to enter the Global settings menu. Press the right cursor button until the display reads ClockSource and set that field to External.
6. Push the rightcursorbutton until the display reads SaveGlobals. Press in the DataDial to save the settings. The display will flash. When this process has been completed, the display will read:
7. Press the PRESET button to return to the MpcEsntl preset screen.
MPC 2.0 Software Setup
1. Launch the MPC 2.0 Software.
2. Open the Preferencesmenu in the MPC Software.
- Mac - Select MPC > Preferences or use the key command shortcut [Command + comma]
- PC - Select Edit > Preferences or use the key command shortcut [Control + comma]
3. Select the Audio tab, choose your Audio Device Type, and the audio device you are using. In this example, an M-Audio AIR 192 4 is used as an audio interface but your I/O selections will depend on the audio interface you are using.
4. Select the MIDI / Sync tab and select the MPK2 series controller as an Active MIDI Input/Output as shown in the image below:

5. Go to the Sync Send tab. Under the heading MIDI Machine Control (MMC), turn this ON.
To ensure that synchronization functions (arpeggiator and note repeat) work correctly, choose MIDI Clock in the Sync Output field.
With these settings in place, you will be able to play, stop, and record into the MPC Software's sequencer with the MPK's transport buttons.
Remember: MPC 2.0's sequencer must be playing in order to send MIDI clock data to the MPK and trigger its arpeggiator or Note Repeat functions.

6. Click OK

7. Then open the MIDI Learn panel (bottom right side of the screen)

8. Activate the ENABLE button, then select your MIDI controller from the drop down menu.
The MIDI Learn panel can be opened by pressing CTRL + Shift + L for Windows, or Command + Shift + L for Mac OS.
