Welcome to this guide on how to set up MPK Mini IV with FL Studio using the included DAW Script - Note, these steps are applicable to FL Studio 2024 onwards.
TABLE OF CONTENTS
- 1. Update the firmware
- 2. Install the FL Studio Control Script
- 3. Load the FL Studio DAW Preset
- 4. Set up on Windows
- 5. Set up on macOS
- 6. Control Map
- 7. Knob Modes
- 8. Troubleshooting
1. Update the firmware
Before configuring your MPK mini mk4, ensure your firmware version is v1.38 or later.
2. Install the FL Studio Control Script
Close FL Studio if it is running before beginning the installation.
Download the latest FL Studio control script by visiting the inMusic Software Center's Hardware tab.
Open the downloaded file and follow the instructions to complete the installation.
3. Load the FL Studio DAW Preset
- Connect your MPK mini mk4 to your computer using the included USB-C cable.
- On the MPK, press the PLUGIN/DAW button and make sure the DAW preset is chosen (the button is lit red).
4. Set up on Windows
- In FL Studio, open the Options > MIDI Settings Menu.

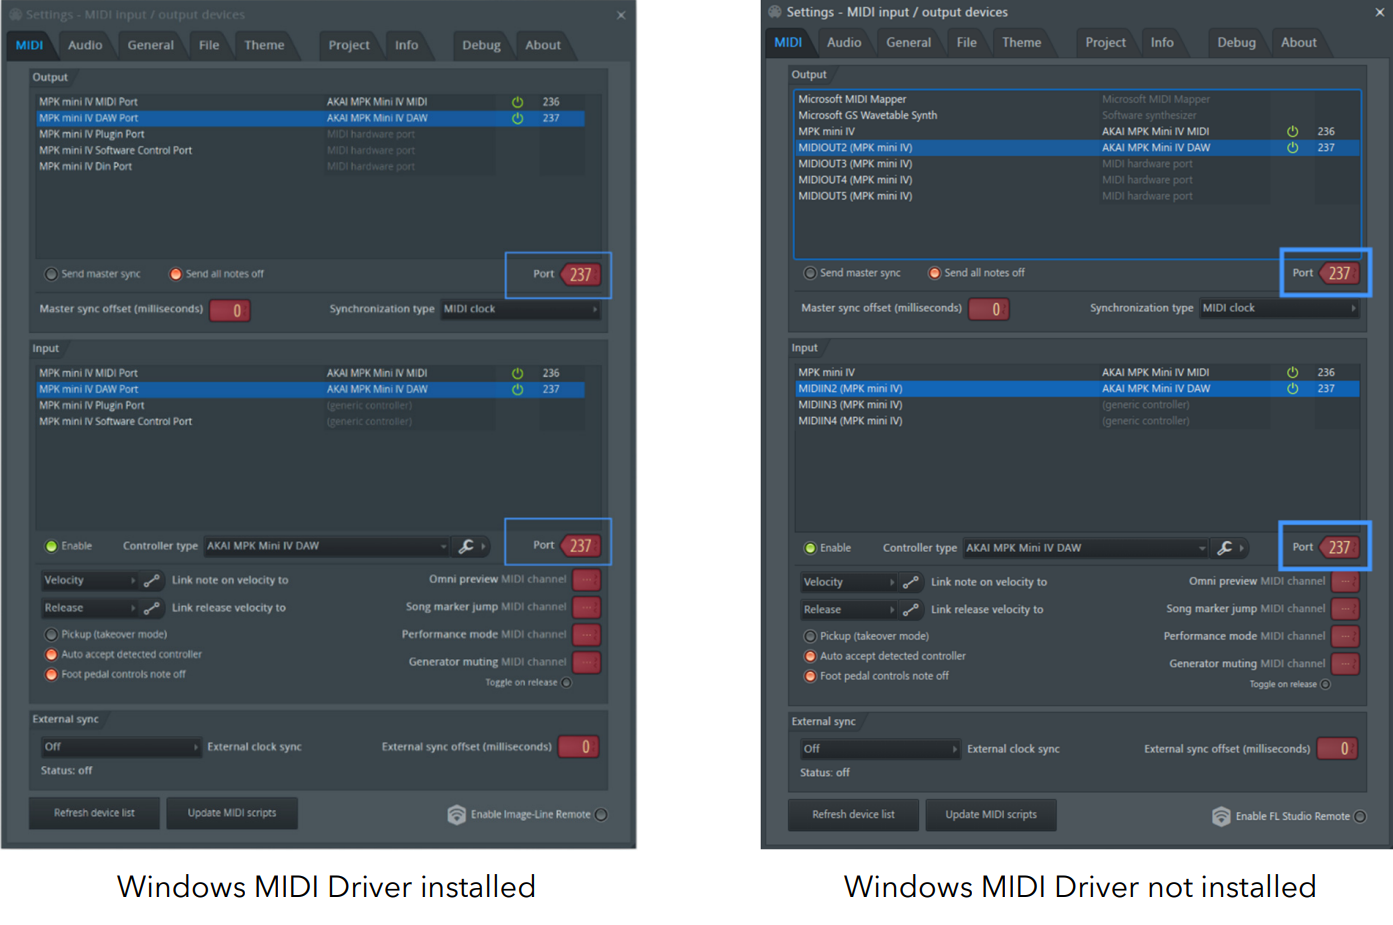
- In the MIDI Settings menu, enable the MPK mini IV MIDI Port and MPK mini IV DAW Port by assigning them port numbers if they are not already assigned. See the left screenshots below.
a. Select the MIDI Port.
b. Drag the Port Number control to enable and assign the inputs and outputs to a port.
IMPORTANT: Use separate port numbers for the MIDI and DAW ports. However, the input and output for the MIDI and DAW ports should respectively share the same port number. For example, set the MIDI input and output ports to 236, and the DAW input and output ports to 237.
Note: The ports appear as listed above when the Windows MIDI Driver is installed. If the Windows MIDI Driver is not installed, the DAW Input Port appears as “MIDIIN2” and the DAW Output Port appears as “MIDIOUT2” instead, as shown in the right screenshots below. You may need to reconfigure your MIDI settings after installing the driver.
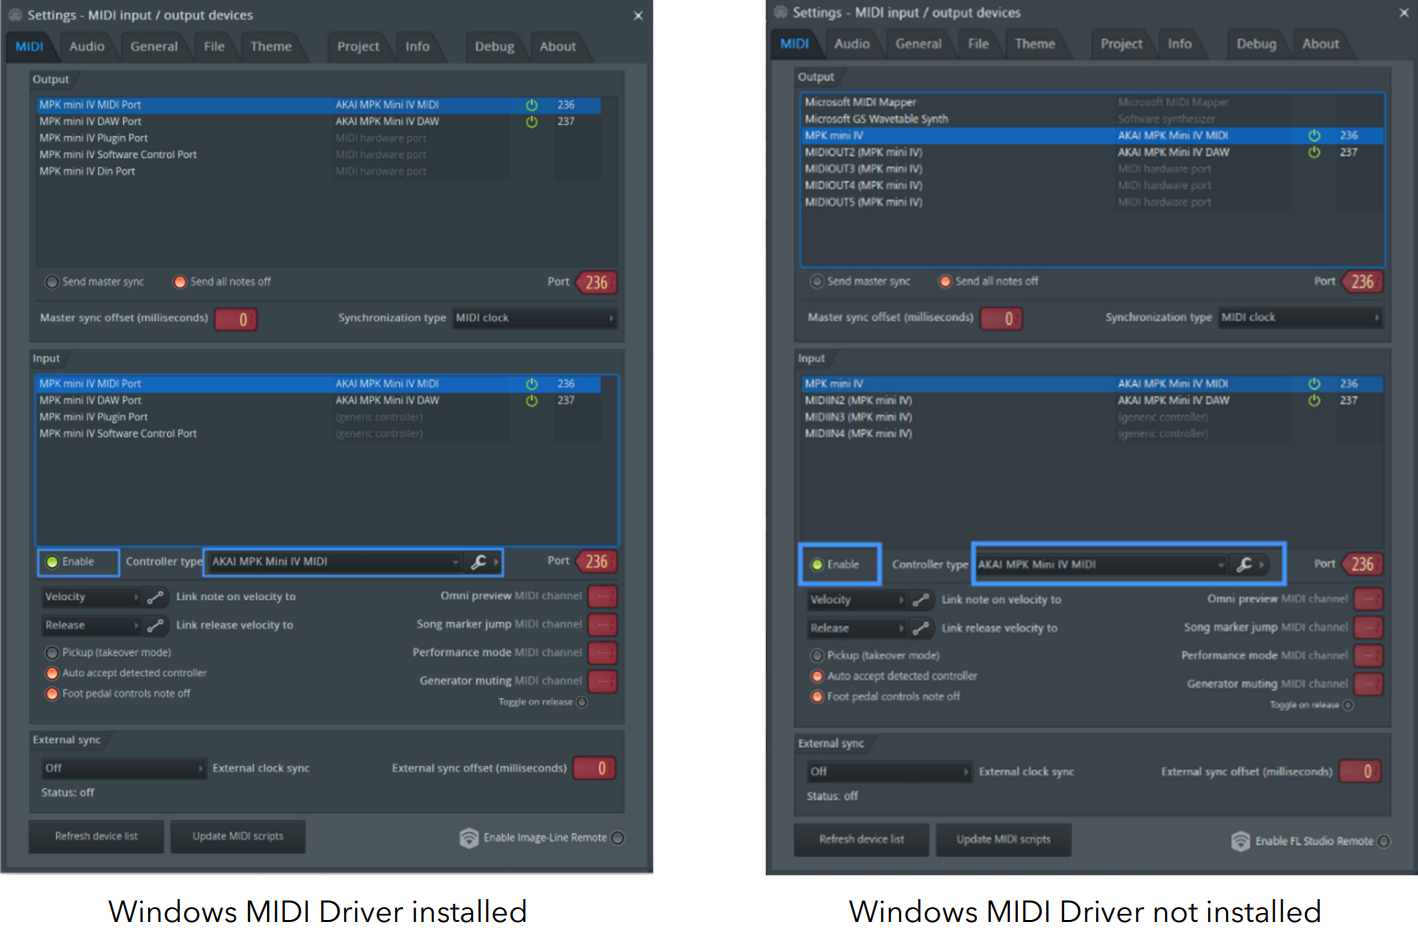
- Select the MPK mini IV input and enable as a controller by clicking Enable. Make sure that the Controller type dropdown menu is set to AKAI MPK Mini IV MIDI.

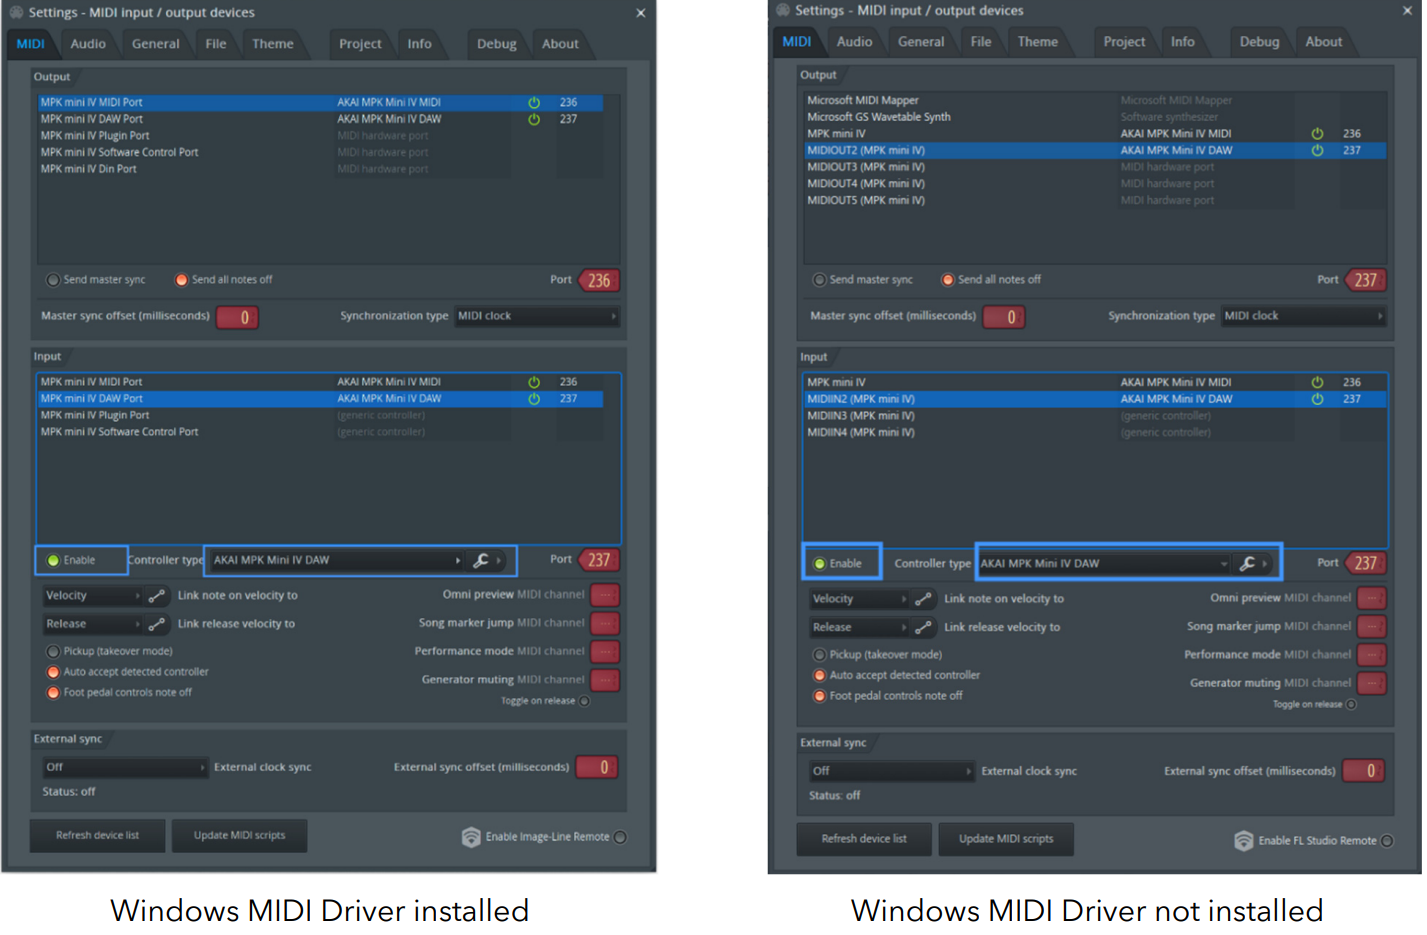
Select the MPK mini IV DAW (or MIDIN2) input and enable as a controller by clicking Enable. Make sure that the Controller type dropdown menu is set to AKAI MPK Mini IV DAW.

5. Set up on macOS
- In FL Studio, open the Options > MIDI Settings menu.

- In the MIDI Settings menu, enable the MPK® mini IV MIDI and DAW port by assigning a port number if one is not already assigned.
a. Select the MIDI Port.
b. Drag the Port Number control to enable and assign the inputs and outputs to port.
IMPORTANT: Use separate port numbers for the MIDI and DAW ports. However, the input and output for the MIDI and DAW ports should respectively share the same port number. For example, set the MIDI input and output ports to 236, and the DAW input and output ports to 237.
- Select the MPK mini IV MIDI input and enable as a controller by clicking Enable. Make sure that the Controller type dropdown menu is set to AKAI MPK Mini IV MIDI.

- Select the MPK mini IV DAW input and enable as a controller by clicking Enable. Make sure that the Controller type dropdown menu is set to AKAI MPK Mini IV DAW.

6. Control Map
This will outline the functionalities of MPK® mini IV’s compatible controls when using FL Studio.

- Keyboard, Pitch Wheel, Modulation Wheel, Sustain Input: These basic performance controls are used for controlling and playing virtual instruments in FL Studio. These controls send their data on MIDI Port 1 and are not part of the additional control script.
- SHIFT: This button provides access to secondary functions when using MPK® mini IV with FL Studio. Press and hold it and then press another button or pad to access its secondary function.
- Encoder: Turn this knob to select channels.
- -/+: Press these buttons to move to the previous or next bank of knob controls.
Hold SHIFT and press this button to switch between Knob Modes. - Knobs: These endless knobs can be used for two different functions, which you can toggle between by holding SHIFT and pressing the -/+ buttons.
- UNDO: Press this button to undo the last action in FL Studio.
REDO: Hold SHIFT and press this button to redo the last action undone in FL Studio - Loop: Press this button to turn loop playback on and off in FL Studio.
- Stop/Play: Press this button to stop or start playback in FL Studio.
Hold SHIFT and press this button to switch between Pattern and Song Mode in FL Studio. - Record: Press this button to enable recording in FL Studio.
Quantize: Hold SHIFT and press this button to turn quantization on or off in FL Studio. This allows the notes you play to snap to the recording grid according to the current time division. - Overdub: Press this button to enable MIDI Blend Record in FL Studio.
7. Knob Modes
The MPK® mini IV knobs can be used in five different modes with FL Studio. You can cycle between each mode by holding SHIFT and pressing the -/+ buttons. The display will show the currently selected mode.
- Channel Volume: In this mode, the knobs control channel volume in banks of eight. The current bank is highlighted in FL Studio.
- Channel Pan: In this mode, the knobs control channel pan in banks of eight. The current bank is highlighted in FL Studio.
- Mixer Volume: In this mode, the knobs control volume for mixer channels in banks of eight. The current bank is highlighted in FL Studio.
- Mixer Pan: In this mode, the knobs control pan for mixer channels in banks of eight. The current bank is highlighted in FL Studio.
- EQ: In this mode, the knobs control EQ settings for the currently selected mixer channel. Knobs 1-3 control Gain, and Knobs 5-7 control Frequency. Hold Shift and turn the encoders for fine control.
- User: In this mode, the knobs are unmapped, allowing for free assignment of controls within FL Studio. There are four banks of available controls, which can be accessed by pressing the -/+ buttons. Assign controls using Multilink in FL Studio.
8. Troubleshooting
If you are experiencing trouble using the FL Studio control script, you can try the following.
Check that DAW Control Mode is enabled on MPK® mini IV:
- Press the PLUGIN/DAW button on the controller.
- The button should be lit red to indicate DAW mode is active.
For macOS users, update MIDI scripts and refresh your device list:
Open Options > MIDI Settings.
Click Update MIDI Scripts and wait for the update to complete.
Once completed, click Refresh Device List.

For macOS users, remove the MIDI device from Audio MIDI Setup and reconnect:
Close FL Studio and disconnect the MPK mini IV.
Open Audio MIDI Setup (Applications > Utilities).
- Go to Window > Show MIDI Studio or press CMD + 2.
Find and remove the MPK mini IV device (select and press delete or click the
-icon).
Reconnect MPK® mini IV and reopen FL Studio.
Was this article helpful?
That’s Great!
Thank you for your feedback
Sorry! We couldn't be helpful
Thank you for your feedback
Feedback sent
We appreciate your effort and will try to fix the article