In the MPC Beats Software, you can use MIDI learn to assign various parameters to your MIDI controller.
Assigning FX Parameters to your MIDI controller's Faders/Knobs
TABLE OF CONTENTS
- Assigning FX Parameters to your MIDI controller's Faders/Knobs
- Open MIDI Learn
- Select the Project tab.
- Highlight Enable and Learn then click the + sign.
- Click the first box under Target and choose the Track, Program, Return, Submix, or Main channel that your FX is on.
- Click the second box under Target to select the parameter that you wish to control.
- Move a Fader or Knob on your MIDI Controller.
- Repeat this step for each desired parameter.
Open MIDI Learn
In the MPC Beats Software click on this symbol on the bottom of the screen to open MIDI Learn.

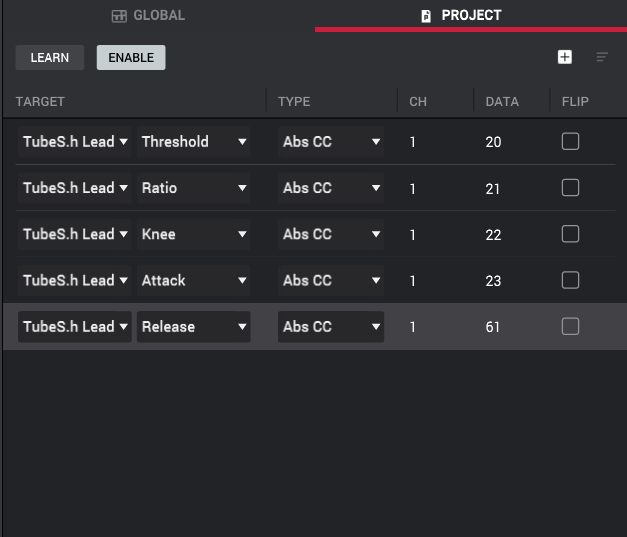
Select the Project tab.

Highlight Enable and Learn then click the + sign.

Choose the Track, Program, Return, Submix, or Main channel that your FX is on.
Click the first box under Target and choose the Track, Program, Return, Submix, or Main channel that your FX is on.

Choose the Parameter that you wish to control.
Click the second box under Target to select the parameter that you wish to control. In this example, Insert 1 on the Tube Synth Lead program is a compressor. Note: This is also where you can select a Mixer or Program Edit parameter to control.

Move a Fader or Knob on your MIDI Controller.
The MIDI Type, Channel, and CC of the Fader/Knob you moved will appear next to your chosen parameter. In this example, the compressor's threshold will now be controlled by the fader that corresponds with CC20. Note: Learn must be highlighted yellow for this step.

Repeat this process for each desired parameter.
Press the + sign again to repeat the process for each parameter and then deactivate Learn once everything has been assigned.